So far I’ve done only street testing with a butt dyno, which are notorious for weak accuracy. To be a bit more scientific I called up my friends at Scooter Swap Shop and set up a dyno session on their rolling dyno. They are super nice guys who know their tuning so if you are into modern auto scooters check em out. Pretty sure this Tomos is the first moped on their dyno but it won’t be the last, (because I’m going to dyno lots of stuff of course).
My plan was to compare all the basic carb and intake options for a stock A55 bike. Start with the stock carb, stock airbox, stock restrictor, then cut the 90 off the restrictor, move to a standard pod filter, and finally the Bazooka Mouth velocity stack with stock airbox. Next is to move to the 17.5mm PHVA carb with a pod filter and again with the Bazooka Mouth and unmodified air box. I figure that covers most of the basic tuning options out there. for sock type carbs.
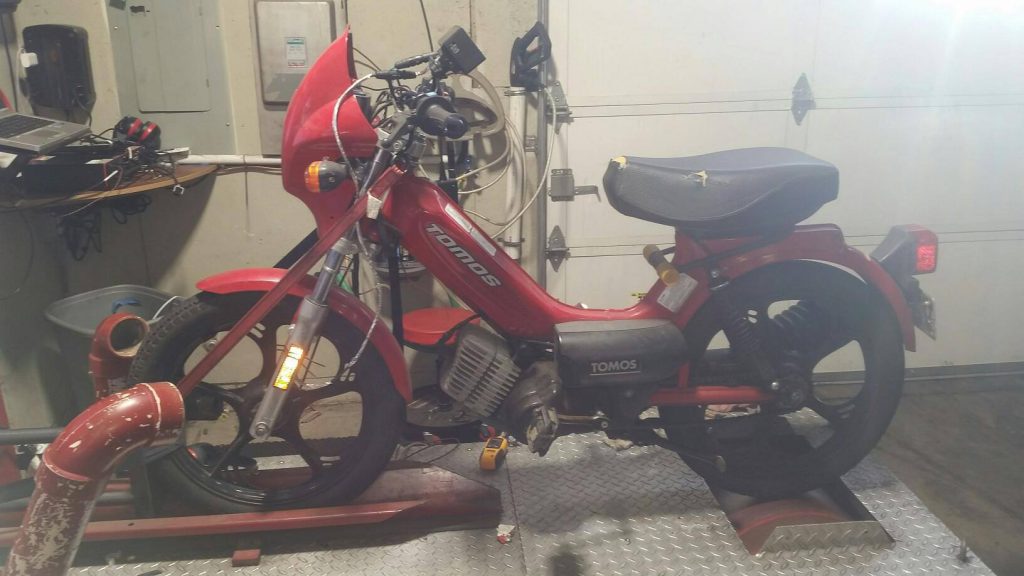
The bike setup is a completely stock top end (never been removed as far as I know), Treats black pipe, 26/22 gearing, first gear clutch is a Lucky Two Strokes ZA50 to tomos 1st gear, 2nd is a 20lbs spring with Treats shoes, and a 1977 unlimited cdi (there was no difference from the stock cdi but I’ll mention it because it is there). It’s been a reliable and daily bike for a long time with an unknown amount of miles on it, but still runs strong. It’s the classic upgear and pipe bike.
Before the dyno day I ordered a new 17.5mm carb, bought a standard pod filter, and did some around town testing with each setup to determine basic jetting setups. I’ve been riding the bike for years with the stock airbox with the 90 cut off the restrictor tube and just jetted at 62 main, A12 needle middle clip, and 35 idle. Been the same setup for years. I did a bunch of jetting testing to determine what felt best and that was going to be my jetting baseline. I also recorded the max rpm I achieved while riding around a mostly flattish area (slight up and down graded but not really hills).
I had a few predictions. First, the pod filter will be slower than the stock restrictor with the 90 cut off. The Bazooka Mouth adapter will be the best of the four tests with the stock carb. The 17.5mm carb will be no faster than the stock 14mm carb with the same airbox. The pod filter will be much louder than using the airbox. And lastly it would be lucky to hit 4hp.
My method on the dyno was pretty simple. Run each setup 3 times back to back to make sure it averaged out and nothing was looking weird or sounding weird. Adjust the jetting up and down while doing 3 pulls each jet change until I find the best main jet for each setup. Then I’ll compare the run with the best average horsepower value for each specific air filter option. I also planned to stop the pull at the rpm that each setup topped out at on the street, which really only limited the runs with the stock restrictor.
The thing to note about dyno usage is I can’t guarantee 100% accuracy for the numbers from this dyno to another. Things like correction factors, air density, quirks of this setup, differences in bikes, ect.. will make similar tests on other dynos read different numbers. The main take away here is all these test were done in the same 4 hour window, with the same bike, and with as many factors held constant as possible. These graphs are relative to only each other and the peak values should only be used as such. I also did a total of 45 pulls, 3 pulls of each specific setup, run back to back. I then used the graph with the best average power as the representation for each setting. I also did a lot of jetting changes with 3 pulls each to compare so the graphs representing a specific set of parts is the best jetting setting I could get as well. I have all the other graphs they are just not included in this for the sake of brevity. I will probably do a deeper dive later but this article is to be about how the best of each setup compares.
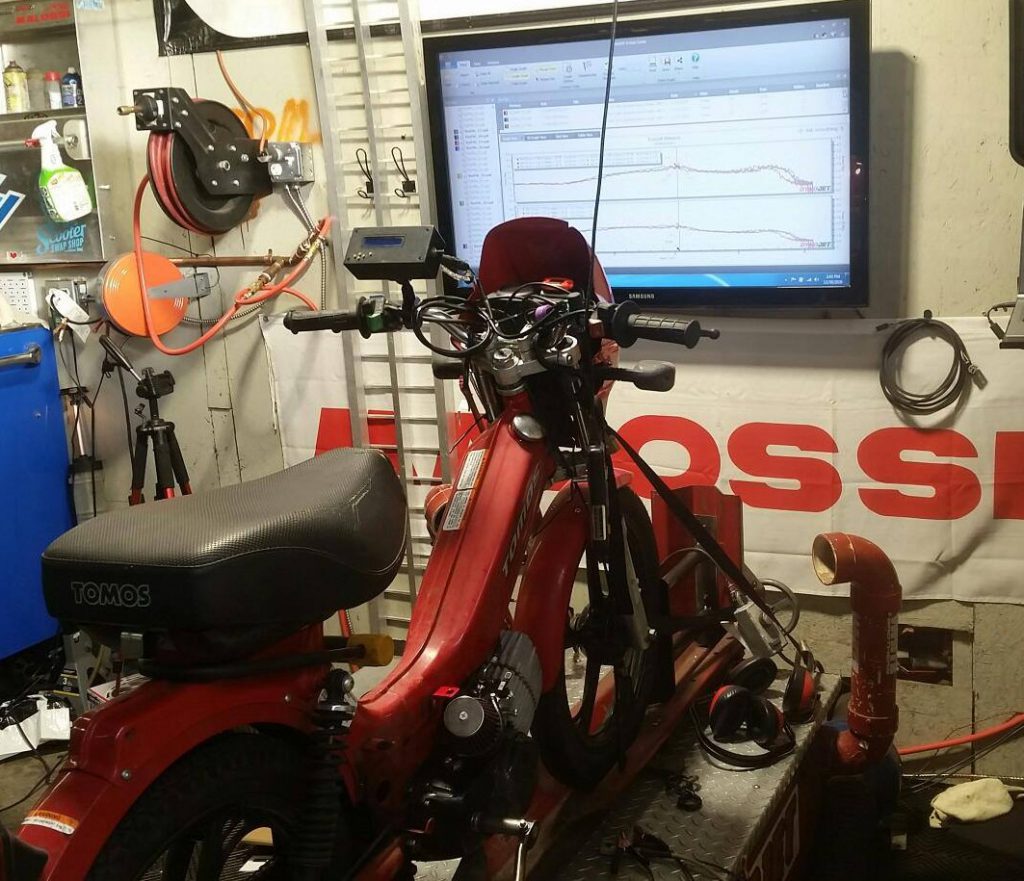
Running the dyno was surprisingly simple. I had a pendant that controlled when it started to record and when it stopped. The software took care of the rest really. I had to sit on the bike to keep the wheel from skipping on the drive drum which made it pretty easy to operate. I only really had two issues with the bike during the session. I noticed at some point I had lost an intake bolt so I had to go back and redo a handful of the runs. The velocity stack rubber also ripped during testing so I replaced it and had to do some more reruns. Overall I spent about 4 hours swapping jets, airboxes, and carbs. Swap shop also supplied me with a decibel meter which I did use to measure the sound volume during the pulls. The meter was about 6 ft. from the bike, but it read 110 for almost every run so it was kind of a wash. I probably didn’t understand how to use it correctly or maybe being indoors with the garage door closed made too much general noise. Not sure, but either way I did try. I still think the pod filter is a bad sound and I will die on this hill.
Oh boy was the dyno surprising. First thing to note was that my selected main jet for almost all the setups were too high. Second thing to note is how much of a difference in power a jet change of 2 actually is. Third thing to note is the 17.5mm carb settings I was using on the street kept it from working correctly and when fixed actually gave a surprising amount of power. So let’s get into the data.
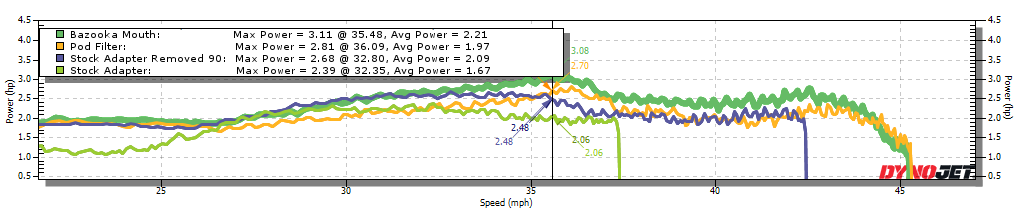
This first graph is comparing the 4 filter options for the stock carb. The x-axis is wheel speed in MPH and the y-axis is horsepower. The graph starts after the shift into second gear because it’s much cleaner looking and below doesn’t really show a lot of information. The lower green line and the purple line have a hard cut off at the end because I stopped the runs there to mimic the max rpm I was able to achieve on the street with those setups. For the stock restricted it was 7400rpm, 90 cut off was 8200rpm, the other tests were stopped at 9k rpms. The way to read these graphs is basically the higher the graph line is the more power the bike is making at that specific speed. So it’s easy to compare two different setups for a given speed range. You can see where the lines cross over, what speed range pulls hard, ect. The graph points out the peak horsepower and also calculated an average power but I’m not sure how it determines the average so take that number with some caution.
The big surprise here is how poorly the pod filter did relative to all other options. From 26 to 33mph it’s producing less power than the stock restricted tube and that’s terrible. It also only really surpasses the cut stock tube from 36mph to about 39mph. Basically don’t buy a pod filter, the only advantage is it revs higher than the cut stock intake tube. I know some of you will say “you bought a bad pod filter, mine works great” but they are all going to be basically the same. The pod filter has a higher peak hp number than the stock cut but it’s average is lower. You want a better overall average. But did you see that top green line? That one that stays on top all the way through and just completely crushes the other lines? That’s the Bazooka Mouth line, just being the best right there.
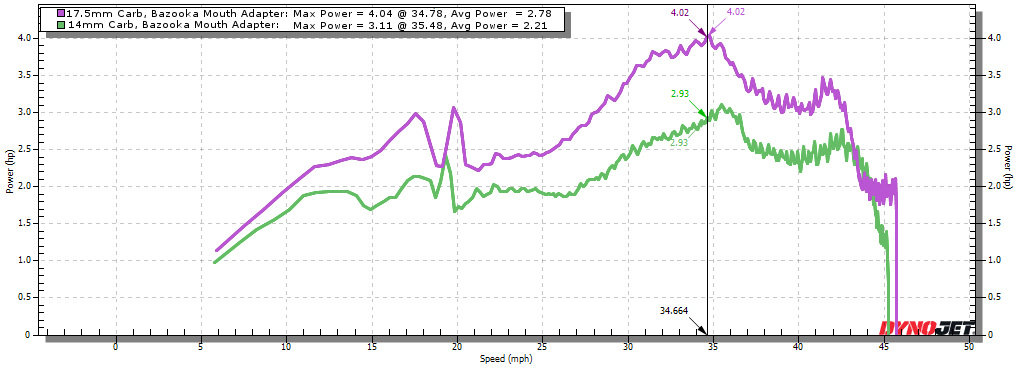
This next graph is the difference between the Bazooka Mouth on the 14mm carb compared to the 17.5mm carb. This is the one that surprised me. It looks like I just copied the line and moved it up. That weird jump in the lines around 20mph is the motor shifting. Switching to the larger carb add just so much power through the whole range. It is a 30% increase in peak power and a 26% increase of the average power. I think my setup on the street when I was preparing was simply the wrong needle. On the dyno I couldn’t even get it to rev out. I switched from the A7 the carb came with to an A12 and it made all the difference. It allowed me to barely crack that magic 4hp number I was dreaming about too.

This graph shows the 17.5mm carb with the pod filter compared to the Bazooka Mouth. This one is very interesting because the graphs cross over at 35mph. Below that the pod filter gives you a little more power, and after that the velocity stack gives you more power. Both lines are very close to each other through the whole range though so what you personally choose is up to you and functionally I don’t know if you will feel that much difference. I’d still prefer the Bazooka Mouth with the stock airbox because it’s quieter and rain will never be an issue. It is fun to note the velocity stack is a smoother curve above 35mph. My thought is that the inlet of the airbox is acting as the restrictor below 35mph on the graph compared to the pod filter. The airbox is 100% unmodified and after looking at it later I realized it still had a big casting flash attached to the inlet on the box so it may have been messing with it a little. I’d like to revisit this specific test later with just a simple 3/4″ bored inlet tube to see if the bazooka mouth test jumps up some. It is worth noting the inlet tube diameter is smaller than 17.5mm (the carb venturi diameter) but about the same size as the stock carb.
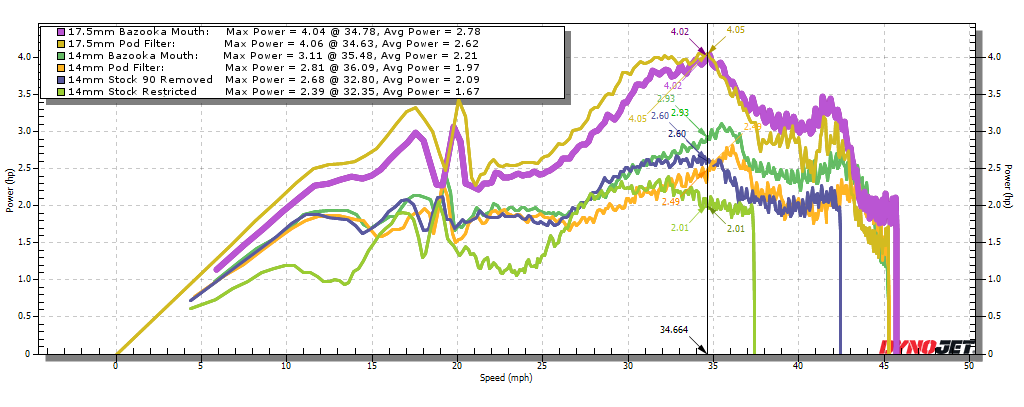
This final graph is simply all the tests together. You can really see the differences here. The 17.5mm carb is such a big jump in performance over the stock carb and that was the most surprising result of this test. For the 14mm carb, the Bazooka Mouth is the clear winner over other options. It’s interesting to note that the pod filter does much worse with the 14mm carb than it does with the 17.5mm carb. You can also see how chaotic the shift is when the dyno tries to read it so it helps to really only look at the graph after that point
Overall the Bazooka Mouth adapter adds 30% power over stock and 32% average power over completely stock and add almost 70% power with the carb. Those are big numbers for such a simple and easy modification. I still run the oil injector with the larger carb too and now that I know how to tune the larger carb correctly will be the new standard setup for this bike. I’m pretty happy with the results. I have a better understanding of jetting and tuning and I really got some good improvements over stock.