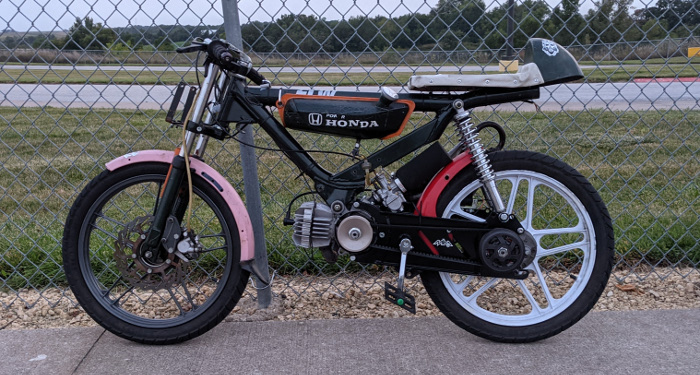
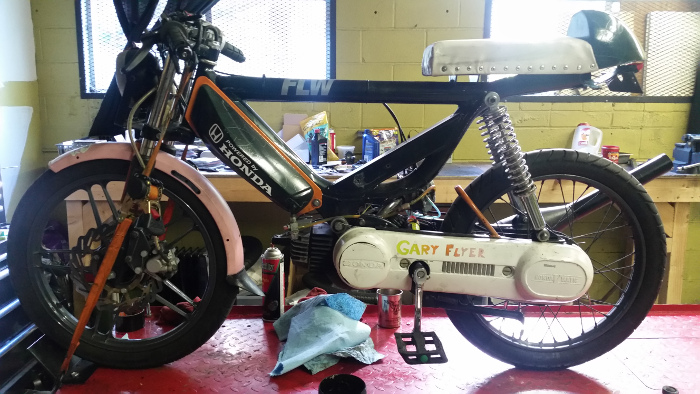
Many years ago there was a Pacific Northerwest Moped Racing series. It ran from 2010 to around 2015 or so when it ended due to lack of participants. One of the locals built a bike to race one year but it never ended up on the track. That was the Gary Flyer. It passed handed a couple of times and I ended up with it. Honestly it was a great build. Hobbit, 47.6mm Athena, Motomatic Destroyer, 4 pedal dio reed adapter to a TM24 flatslide with an HPI inner rotor, disk brakes, ect.. I rode the bike around as a daily for a long while, and would take it out for practice days at the local track. Going into the 2017 Moped GP in California I did do some modifications to the cylinder, reed block, intake, and some aspects of the stance and comfort. I was pretty happy with the performance of it with regards to the other bikes there and if it wasn’t for me forgetting the clutch arm circlips I had a good chance of a decent result. So that’s how the bike lived for a long time.
Then not long after, the head gasket went and poked a hole in the piston dome. Now I could have just thrown a new piston in it, clearly. But I used it an excuse to do something I’ve been wanting to do for a while. See, I built a stroked hobbit motor using a moby crank and a minarelli scooter rear clutch setup for a raffle bike I did years ago and I really wanted to built a updated, more refined version of that motor for myself. I was working at a machine that let me use the equipment at me leisure so this seemed like the perfect time.
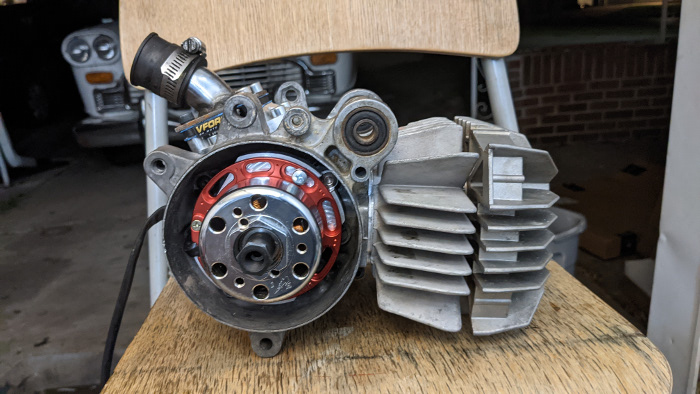
The base of the conversion is that a moby crank is very close to fitting in unmodified hobbit cases and the moby has a longer stroke (hobbit =39.6mm, moby=41.6mm). The hobbit and the moby both have 47mm kits so you can use a moby 47mm piston with one of the two hobbit 47mm kits and that gets around the wrist pin differences (hobbit = 10mm, moby = 13mm). The displacement increase is 3.6cc or 5.2% (hobbit with 47mm piston is 68.6cc, moby is 72.2cc). The deck height (the distance from the crank centerline to the base of the engine case) is roughly the same but with the moby crank you have to add shimming between the cylinder and the case to get the spacing you need. This is better than the other way where you would need to machine the case or the cylinder. For an ignition you need to run a moby ignition and there is some issues there to sort out for sure. The clutch side is easy, you can buy an ER3 and reverse it to allow the belt to align better with a scooter rear transmission but it just bolts on with no modification really. The rear transmission needs to be converted to run a scooter rear clutch to complete the package. Now I’ve heard that a urban express input shaft is easy enough to install into the hub but I chose to use a scooter input shaft and fix it to a stock hobbit input shaft. From there you just throw whatever scooter trans parts on you want, use whatever reed and intake, and pipe you want and it should be a pretty fast package.
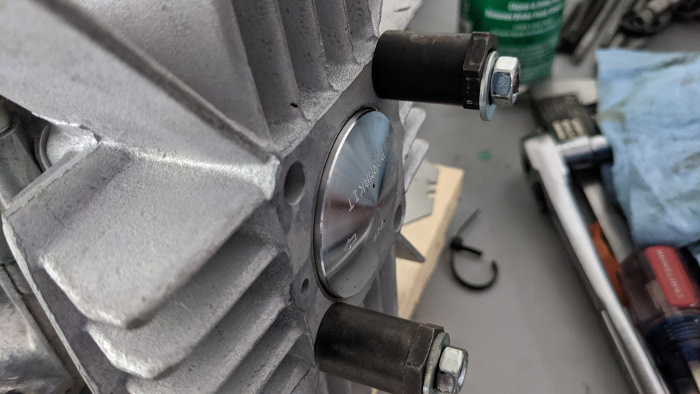
The first time I did this it was quick and kind of clunky. I had concessions with parts I had available to use for that build and the space to put them in. My plan for this was to figure out a way to machine the engine cases to allow all of the other parts to bolt to it for the entire conversion with no modifications. The first time I had to do a lot of odd machining and alteration to get the cdi to fit and I was unhappy with how it turned out. This time I wanted to have a bolt on conversion plate that allowed me to run a HPI mini rotor for a moby out of the box. I also wanted to use a minarelli horizontal scooter reed block to allow me to use scooter intakes off the shelf. I also wanted to convert the cases to standard seals instead of Honda specific 25.5mm OD factory seals. I wanted to develop a retail, more professional conversion package.
The case modifications are actually pretty limited. You have to make a very small clearance cut for the larger connecting rod large end of the rod, and as for fitting the crank that’s really it. I added a small amount (0.5mm depth on each side) to the bearing width clearance but it turns out I didn’t need to do that to get the crank to fit. The clutch side seal seat was reduced to 5mm depth (I’ll talk about why I didn’t do that initially but I had to fix it later) and bored to 27mm so I could fit a standard 15x27x5 seal. On the flywheel side I simply cut the center seal boss down to the same height as the stator plate bolt platform, making it flat across from bolt to bolt. This allows you to run a standard seal with no modifications already since the hobbit cases are larger further in toward the crank. From there I designed an adapter plate for the HPI (and only the HPI, other moby ignitions will not fit this adapter) and CNC machined them at work. Simple as that really. All you need is free access to high quality production CNC equipment!


The one available 4 pedal adapter on the market didn’t quite do what I wanted the way I wanted. I had issues with it. Instead I chose to use a reed that better fit in my opinion. The Minarelli horizontal scooter engine is the gold standard for fast auto scooters and there is a massive range of existing high performance options available for it. Perfect really. I also want to see how the reeds operated if turns 90 degrees to the normal orientation, just out of curiosity. The immediate issue is the mina intake does not have a symmetrical bolt pattern, The second issue is they hobbit intake bolt pattern and the mina bolt pattern does not line up well so the only solution I could see was to have two adapter plates. The first bolts to the case, the second bolts to the first and then the reed and intake can be bolted to the top plate. This adds complexity and another gasket surface to deal with but it did what I wanted and still fit very well but I would have preferred a cleaner solution. I chose v-force3 reeds and the Malossi 360 intake with a 10 degree angle intake boot from a RC-One for a better carb angle. It took some time to get the right intake I wanted but the team at Scooter Swap Shop helped me out as always.


The rear transmission was some effort too. So a hobbit input shaft is actually pretty small in diameter compared to a minarelli scooter input shaft. The plan was to bore the scooter shaft out to press fit it over a shortened stock input shaft then plug weld it in 4 locations offset around the outside under where the bearing would sit to support it as much as possible. This required installing a bigger bearing and seal into the case. I went with the next OD bearing and seal that would allow the new parts. I also ran a spacer to keep the gearbox engaged at all times as well. I’ve had problems with higher powered hobbits kicking out and I didn’t want that. This allowed a fully unmodified mina rear clutch assembly to drop onto the hobbit transmission. While it’s cool the crank also stroked the motor out the real big benefit for me was the ease of converting it to a much better transmission design with tons of available high performance parts.
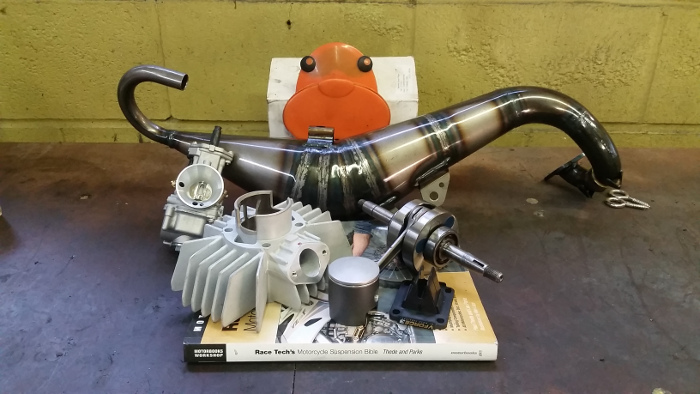
With the core concept machined and done I was still really far away from having a running motor. Slowly I gathered all the expensive parts I needed. A partial list was a good doppler crank, a HPI mini, a Metrakit cylinder, the Parmakit 47mm piston, the reverse Malossi Variotop, Stage 6 rear clutch and, bell, Vforce reeds, exhaust of some kind, Polini 24mm carb and air filter, and all the hardware to put it together. I also grabbed a MLM subframe to give it a try. Now a quick glace at that list tells you it’s well north of $1000 and I frankly never have that much to spend at one time on mopeds so I gradually pieced it together over 2 years. This project started in 2017 mind you and I didn’t even get to fire it up until 2019


On that note I didn’t actually see it running until 2020. It took an outside force to get me to finish the first build and it didn’t go great. See, if you go through the effort to design and setup CNC machine you might as well build a handful. I was talking to my friends in Kansas City Duane and Hunter about their Hobbit race bike they used in the Midwest Moped GP race. I agreed to build a second copy motor for them to use. I would do all the machining and they would buy their parts and assemble theirs. This was to be running for the 2019 Moped GP Midwest and the St. Louis races. Now if you know anything about building bikes on a timeframe you know it never gets done until the night before. As the races got closer they realized they were running out of time. Duane contacted me and asked if I could mail them my motor because they did not think they would have time to assemble theirs. I agreed of course but I hadn’t actually assembled mine yet. So in a 2 day stretch I finished mine and mailed it out to them. Now this was not the timeline I was planning on and I had to make one concession. I needed to weld the decompression channel shut since I did not need it and it’s a liability for the head gasket. I made a choice. I used Alumaweld low temp filler rod at home to fill the channel and valve hole and then sanded it flat. Other than that it was a strait forward build.
The motor was mailed out and I waited to see how it went. As the first race got close it was clear it wasn’t going to be complete enough to bring so the choice was made to attempt to make the second race with a complete bike instead. Then the weather turned and flooded the track, canceling the event. At this point the bike had started but that was about it with the plan being to tune at the track. A new plan was formulated to take it to a local track day and tune it in. Then use the settings on my motor to copy to their motor as they build it, planning to be very ready for 2020. So they take the bike to a track day and get about 5 laps when it just stopped running. I immediately got a phone call and we were able to suss out what had happened. So remember in the last paragraph I said I used low temp filler rod to fill the decomp channel? Well it melted out. Whoops
They mailed the motor back. I took it apart and felt stupid but also glad they didn’t actually take it to a race and have fail there. Upon inspection though it seemed everything was still fine it just needed a new head. Then something dumb happened, 2020 in it’s entirety. I ended up between jobs and at home for the summer. I was also living in a place where I could not store all of my bikes so I was keeping about 8 of them in a storage unit. My plan was to pull a bike out, repair it completely then swap out for a different one and keep doing until I went back to work. That put my hobbit in the firing line. Now I knew to finish building mine was still costly so it wasn’t first but it was on the list.
When it finally was time to build it I still had a huge number of things to do. First of all the motor needed to be rebuild to make sure there was no deeper damage. Secondly I needed a new head, third I needed to fabricate an exhaust. The head was easy since Treats started selling a new version of the head I already had with no decomp so I purchased that. The pipe was interesting. Swap Shop had given me a preproduction pipe designed for a minarelli horizontal scooter that was missing the muffler and had no mounting system that I was told was a prototype Polini. They also gave me a used Leovinci pipe I robbed the header flange and the muffler off it to complete the much better pipe. With some cut and welding work I was able to wrap the pipe in a high and tight shape that tucked tight around the frame and motor while also looking great.


Now I ran into an odd issue. See the stroked crank requires me to run a 2mm base plate to shim around the new piston height. When I built the motor to send to the Spicy Boys I set the port timings to 124 transfers and about 190 exhaust. Not super crazy but those are higher duration numbers for sure. So when I realized the new head with no decomp was actually shaped differently I had to figure out what to do. The head with a decompression channel was recessed by 1mm from the gasket surface but the new one with no decomp was flush with the surface. So I needed to move it further up. I, foolishly, chose to add 1mm of extra shim to the base to get the required piston the head clearance I needed. Now the first thing you might notice is that actually moves the port timing up higher. Meaning it would probably run at even higher rpms. That’s mistake one. Eventually I was able to get the whole bike together and then realize I had no good was to start it. My exhaust was just too tight around the flywheel to use any sort of pull rope and the transmission left no starting mechanism. It was drill start only. I was finally ready to start it up so I mixed up some gas with some oil I had sitting around and started to process of breaking it in. Mistake two.
I wanted to take it easy, break it in nicely and try to be aware of any issues that would creep up. I had been working on this daily for about 2 weeks full time since I didn’t have a job. And I was getting excited to finally be running this project I’ve been working on for 3 years at this point. The bike fired up easily and test rides began. I was predicting the rpms where the power came on would be around 9-10k rpms but the transmission was shifting too low and I was running out of weight to remove from the variator. I swapped out the contra spring to the next highest strength I had around. On my next test ride the shift rpms jumped form 8k to 12k and then, riding a mere 25mph but at 12,000 rpms, the motor hard seized. I pushed it home
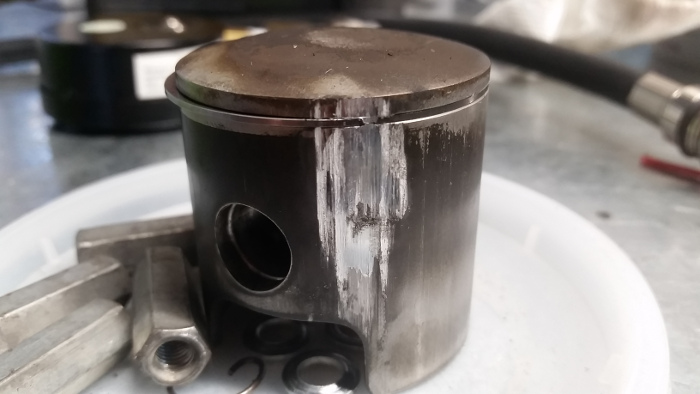
Back to the mistakes I made. First, the correct solution to the head issue was to machine the depth I needed into the head, not move the port timings up into a range higher than I wanted to run. I was just trying to get it together and didn’t want to drive over to use the lathe, which, yea, I know, pretty lazy. Next the oil I had sitting around was actually just a bottle of the remains of many used bottles of gas station oils. The worst 2 stroke oil possible basically. Again, instead of driving down and buying good oil. My conclusion is the spring change caused the rpms to spike to a very high rpm at very low moving speeds and the cheap oil just flashed away under the heat and friction, ruining the motor under almost no load. I was so mad I just shoved the bike back in the storage unit.
A year went by. I moved to Kansas City. There was a new Moped GP race scheduled. Both motors were in the same place. It was time to finish this.
I, foolishly, assumed all I needed to do was put a new piston in and new top end, and be more careful about the setup. Well…there was some other issues I had. See, I had purchased a Malossi reverse multivar large diameter variator to use but it wouldn’t sit down all the way because it hit the case, so I was running a flipped ER3. I wanted the large transmission range so I needed to split the motor and modify the cases to fit the multivar. So it was a full rebuild with more machining. Great. So as a side note I wasn’t working and I did not access to a lathe. Until I fully rebuilt a very old lathe for a local shop, which I will talk about later, but for now be aware that to rebuild this engine I had to restore a lathe to just move forward. Anyways the clutch side case was modified to run a more standard seal, a 15x27x5mm seal. This is an easily found seal that is thinner and will allow me the extra depth to run the multivar. Whoo.
Next I also had to turn the new cylinder sleeve down to fit the cases. The usual modification is to bore the cases out to accept the large sleeve for really large kits but I did not want to do that because in the future I might switch to the malossi water kit and it has the stock skirt diameter and I wanted it to be supported when that happens. So the metrakit skirt needed turning down. I also did the correct work and cut more depth into the cylinder head, avoiding the issues I had last time.


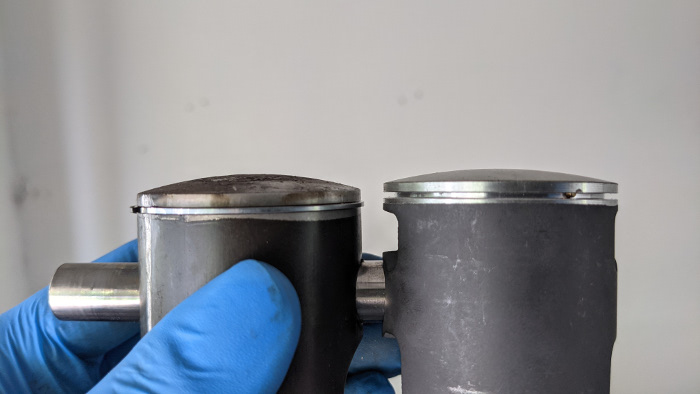
The piston I trashed was actually special. I had it ceramic coated by a local Portland company that did a wonderful job. It had a low friction coating on the outside, a heat barrier coating on the dome, and an anti-oil coating on the inside. I was not able to find a place to do that locally for the new piston so I lost that fun aspect. With the new piston and all the machining done it was time to port the new cylinder. Now I’ve realized my new problem. The new version of the motobecane parmakit 47mm piston is taller than the old one. The wrist pin the dome is 2mm taller. This absolutely wrecks all the port timing, cylinder to head, transfer port timing, ect. It’s just a mess. The new piston with the old base plate stick 2mm out of the top of the cylinder at TDC, with the piston ring on the edge of pooping out. The easy solution is to add 2mm of base plate but that moved the transfer timing to 136 total duration, which is very high, higher than I wanted to run. But I had no good choice. with 30 deg blowdown the exhaust jumps to 196, again, a bit higher than I wanted to run. I was gun shy after wrecking the last cylinder so quickly with excessive port timing but I felt like I was running out of time and options that were easy. So that’s why I did. I used 4mm of base plate shimming and ported to 136/198, against my better judgement.
Finally I had it all back together with about 2 weeks to go before the race. I still had to finish the tomos as well so my time was split. It fires right up, and then nothing. Idles great, makes no power. I start to throw all the tuning adjusments at it and I get nothing. No power, does 25 weakly. I start to go through everything. I replace every part I could possibly change. Nothing. The race is getting closer. I start to think maybe the port timings are too high and the air flow it stalling or fighting with the pipe. I did around my spare moby parts and find a 47mm Airsal piston that is 1mm shorter wrist pin to crown, shorter than my current piston but still 1mm longer than the old one. I reconfigure the whole top end to have 2mm of shimming, multiple head gaskets, and a port timing closer to 126/188, with the piston protruding 1mm out of the top of the cylinder. And nope, also not the solution. Finally I try a completely different carb, a TM24, and finally, it starts to run. Then I realized the fault, the stock slide needle that comes with the Polini 24 carb is so rich is strangles the motor but will still run no matter what. Simple to fix, I buy the box of needles and hope it fixes it.
I get the box of needles on Monday, I had 3 days to sort it and the tomos. The first needle I grabbed from the box made a huge difference but it was still too rich. I figured I’d have to just sort it at the track. When I got to the track I had 3 bikes to tune. I made the plan to tune the tomos first, then Hunters hobbit, which is basically the same motor as mine, and then finally mine. The tomos went pretty smooth and then Hunters took a while longer. I didn’t even start it until after the qualifying and the reverse grid races. It was about 4 in the afternoon and it was time to start finally. After a couple hours of frantic work I finally got the sound I was looking for, that high pitched, crisp tone with pull. Excited, finally after 4 years of work, I rolled into the pits with a smile and tell Hunter to go try and break it. I figure if it was going to blow it might as well do it now. He pulled 20 minutes at full throttle around the track without issue. Success at last.
We took second in the variated class with Hunter on my bike. It was everything I could have wanted it to do. Proof that the concept worked. You can read more about it over here. There is a lot of tuning to do still and I have a lot of plans for it. I figure if it could take second barely tuned in and only using half the variator then I got a pretty good shot next year. That is if I bother to work on it before the next race weekend.