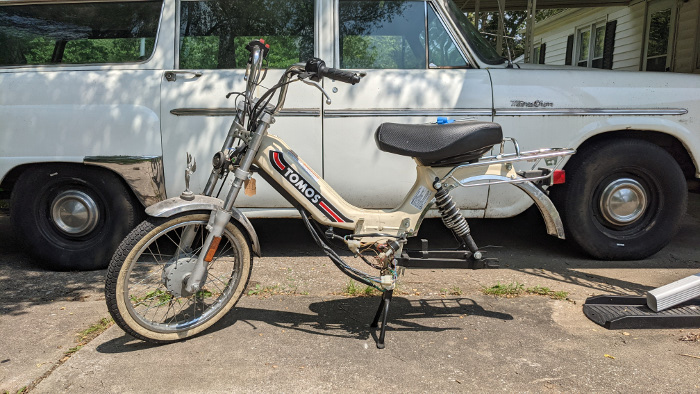
Now it’s no secret I’ve been swimming deep in the world of stock A55 tuning the last couple years. I’ve been working on my Bazooka Mouth velocity stack for over a year. I felt pretty confident it was just the best but I needed one big final test. Then an idea formed. I was already going to the Moped GP Midwest to race and Duane of the Spicy Boys had a brand new, zero mile, Tomos A55 sitting in the bathroom of our local motorcycle co-op. Clearly the best final test is to try to win the stock class with a full stock airbox. I asked him if I could and he agreed. Game on.
So, as I wrote about a little before (here and here), I put some additional restrictions to this build on top of the class rules. It had to be as stock Tomos as possible. I wanted stock brakes, forks, carb, full airbox with filter, head, piston, cylinder, ignition and cdi box (no curve basically), seat, and functional pedals with starter mechanism intact. Now I would allow myself to modify these parts but only with a dremel and manual grandpa’s lathe. I work as a cnc machinist and that’s out of the scope of the average person to use so I considered it off limits. The bike also needed to be easily turned back into a road bike with fenders, lights, ect.. once the race was over. The other restriction I gave myself was I was not allowed to shim the cylinder at all, it had to be stock shape, just with porting done to it. That means no crazy port timings. Oh and I could only buy parts from treats (mostly).
I had my restrictions, so what did that leave me? Well honestly it’s a pretty solid starting point just because of how nice the stock Tomos is. I knew I needed to focus on making the bike as light as possible, the suspension needed to be as functional and usable as any moped has ever been, use the best available tires (but not slicks, again just from Treats), reduce as much drive train loss as possible, the brakes have to be top notch, try to lighten the transmission, and make the motor as strong as I could. That’s still a big list so I’ll just go through each part separately.
Suspension I felt was going to be the one big edge I could gain. I did some research as to what the fast bikes in the class were and the only one I was concerned about was Ed’s flat reed derbi. It had won the class every year and was going to be hard to beat. In a straight drag race I was unlikely to win so the corners needed to be where the lap times came from. Duane had some mid rise dirt bike bars and since I was using the stock seat in the stock location it was going to be the best bar/seat combo. I’ve mad the mistake of having very aggressive or low bars that end up being awful for the track, and I find a very neutral seat to bar height with most of my weight on the seat instead of forward to be best for my riding style. I also knew that the stock fork rake and trail was ok but I wanted a steeper angle to make steering more snappy and aggressive. The only way I had to achieve this was to lengthen the rear shocks since I could not lower the front forks or change the actual frame fork tube angle. The limiting factor is actually the swingarm. It can only move so far before it hits the pipe mount so that determined my maximum shock length and therefore my fork angle. My past experience for shocks have been they are all too stiff. They are usually built for motorcycles that weight much more so the spring rate and preload is just too high. I had yet to try the Treats progressive shocks so I ordered the 290-310 adjustable set. They have adjustable length and preload, both being very important.


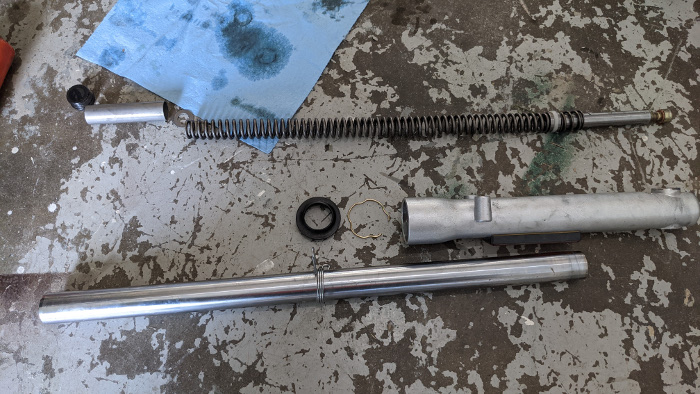
The one big thing I allowed myself to buy that was not going to be found at Treats was Gold Valve Cartridge emulators for the front fork. Stock A55 Tomos forks are 30mm OD, oil dampened telescoping forks using a dampening rod system. They are manufactured by EBR but are much better fit, finish, and design than the standard hydro EBR’s usually found. For one they are 30mm and not 28mm, they run a proper seal inside instead of two rotary seals stacked, and the interior finish of the lower fork leg is much better finished. The one major drawback to the forks are the way the upper and lower tube interact. They just slide inside with full side contact from top to bottom, a better fork would use two slider rings to keep the contact point smaller and lower stiction forces. I can’t fix that easily so it just had to stay that way. That dampening rod though, that thing is just trash. Without going into a huge tangent, fork function allow the wheel to follow the bumps and forces of the road without losing contact or making the ride harsh. The spring does the heavy lifting of holding the bike up but it’s the dampening that tunes the oscillations out to achieve a smooth ride. Dampening rod systems are very simple but they also have negative characteristics. At low speed for movements (small bumps) they do not dampen enough, and at high speed movements (big bumps) they get very stiff and lock up. Just awful. The Gold Valve system is a drop in way to improve the response characteristics while also giving you a quick way to tune the system. You are given to control low speed response and also high speed separately with accuracy. Basically I was going to have real suspension on a moped finally.
Now the only bike I could find that also uses a 30mm fork they made the valves for were a KTM 50SX from the early 2000’s (pat number FEGV 3003). I did not know when I ordered them the 50SX actually only used one fork with internals so the box only had one in it. I needed two. I also didn’t realize finding the second one was going to be hard. Eventually I just called the company directly and they had one left in the warehouse so for those out there that want to try this I think I bought the last two available. When you purchase these they come with a code that gives you access to their setup database. Now clearly they were not going to have “Tomos you wildin on” but I was able to glean a little bit of info out of the charts. Mostly fork oil weight and setup starting values. My initial setup values were 120cc 10W fork oil (stock volume when measured what came out, no idea what the stock oil weight is), the 3 hole low speed dampening disk (medium basically), and 4 turns preload on the high speed dampening. I also started with the stock amount of spring preload, adjusted for the addition of the gold valve.
Once the bike was fully assembled again I started basic suspension tuning. I wanted the steepest fork angle so I adjusted the rear shocks to the longest the center to center could be before the swingarm hit the pipe mount with a bit of breathing room. Next I rode it around and tried to get a feel for it. It seemed very stiff still. I needed to set the static sag. That simply means how far does the bike sink when you sit on it. I had Hunter help me measure the front and rear heights to the top mounts before and after me sitting on it and…. it didn’t move. Well there’s your problem. The rear shocks were easy, just spin the preload for the spring down until I achieved 1 inch sag in the rear. The front required me to cut shorter preload spacers. I used 1/2 pcv tubing and cut 45mm spacers, replacing the previous 58mm spacers. This simple bit of adjustment got me 1 inch sag front and rear. Next I changed the gold valve to the 4 hole low speed disk and 2 turns preload on the high speed spring. Honestly there are many more dimensions of tuning the parts here but these setting are what we used the whole race and while I’m sure more tuning could make it better it was already so far ahead of normal moped suspension it didn’t even matter. The ability to throw it into a corner and just rail was so much improved compared to any other bike I’ve raced I’ll never go back. It seems obvious that mopeds have bad suspension that no one ever fixes it. But it’s worth it.


So the wheels and tires were interesting. The stock new Tomos has spoked rims with 110mm brakes drums. These looks great honestly but they weigh 7.2lbs (rear only, I didn’t weigh both but consider it representative). So I took it apart to see what the individual parts weighed and learned the rim itself is still 3 lbs. The construction is steel so I contacted Treats and asked how much their aluminum rim they sold weighed, it was 2.5lbs. Now Duane had a set of A35 mags wheel and the rear weighs 6.4lbs. Even if I respoke with the treats aluminum rims they still weigh more so the clear choice was the mags. The bonus was being able to run the mag rims tubeless. I ordered the cheapest valve stems from amazon (which was maybe the wrong choice but ehhhh) and with fairly minor modifications to the rim and the stems I was able to mount the tires with no tubes. That saved me an additional half a pound per wheel, of full diameter rotating mass! Would I recommend that conversion for a street bike? Maybe? The one issue I had is during the only crash the bike had all weekend it did knock the tire off the bead and deflate. I think for a daily a tube is more reliable but I will absolutely run tubeless at the track again. Also I ran GP1 2.25 tires because there are no other tires to run that compare in that tire size, pretty easy choice really.
I also decided to balance the wheels. The static balancer I used required me to remove bearings but other than that it was pretty simple. Each wheel ended with around 1.25-1.5 oz of weight (30-35gr) which is a lot. Like a whole lot. It ended up being around 180 deg from the valve stem so I assume that’s the real part it was offsetting. I made sure to paint dots on the tires at the valve stem so I could reorient the tire if need be as well.
The brakes are the brakes that the wheels came with. But it’s critical to take every part apart, clean and deglaze the pads, sand and deep clean the hubs until they are shiny, and actually grease each component that pivots. Be careful not to get grease on the brake shoes or drum, but put grease on the pivots, the arms, the cam interface, ect.. I also ran bmx long pull brake levers, 5mm teflon lined brake cable outer housing, and new inner steel cables, with soldered tips. They work as good as any disk brake could ever work and did easy stoppies and skids, There really is no reason to upgrade honestly.


I also decided to be silly with the chain. So one issue with Tomos across the board is Black Wheel of Death. This is mostly the result of them never properly sealing the transmission on the sprocket side of the motor. You have to attack the problem in a couple ways. First you must buy the sprocket nut with the seal in it. Second you need to use sealant on the surfaces between the sprocket, spacer, nut, and locking tab. And third I did not use chain oil or grease. I actually switched to a dry paraffin wax with PTFE powder. I followed this video since roadie bikes guys are hyper aware of transmission drag and therefore the best to consult when tips for reducing chain drag. I used an intentionally non-HD chain (aka the lighter chain) and mineral spirit bathed it, then ultrasonic cleaned it, and finally a 3 hour wax + PTFE 1.6 micron powder. It’s really simple, it works great, keeps the wheel and drive train super clean, and after a weekend of heavy racing with 700ml oil in the trans there wasn’t a drop of oil on the case and the chain was dry and clean. Just a little bit of dry road dirt picked up. Plus the extra friction loss is really just free power. It’s baller status is what I’m saying
Lightening the transmission has been something I’ve wanted to attempt for a while so I figured this was a good time to give it a try. Now I know that Jake had done a lot of transmission lightening but I didn’t want to research what he did specifically until I took a crack at it. Now I was only really going to be using a lathe for this and some other tricks. First step was to really study the parts in the transmission. The transmission has three shafts; the crank, the driven gears, and the primary gear. The priority is to remove weight in a way that reduces the total rotation inertia. That means weight removed from further out is worth more than closer to the center, and weight removed off the shafts that spin faster is worth more than the slower shafts. So removing weight from the clutch bell is worth more than the driven gears for example.


Now I had a couple of restrictions on what could do. I wanted functional pedals, functional kick starting, and stock clutches. This means I couldn’t do most of the modifications that Jake could. (side note: Jake Cain has built, in my opinion, the most legendary Tomos and has a wonderful open thread about it you can read here) I decided to not really modify the clutch bell because I simply ran out of time. Most of the parts I couldn’t figure out a way to reduce the weight without making them unfunctional so I only really modified the gears. The primary gear weighed 1.4lbs and I was able to get it down to 1.2lbs. The 2nd speed driven gear was 260g and I was able to get it down to 246g. The 1st gear driven weighed 353g but I had a trick planned. It holds the sprag clutch outer with two square tabs so I turned the sprag clutch outer down to remove the square drives, then turned the drives off the gear and brazed the two part together directly. The sprag clutch outer weighed 53g but I got the combined weight down to 373gr, a reduction of 33g. Now none of this involved drilling holes through the parts, just turning them on a lathe. So I have more room to reduce weight if I want. To compare to Jakes parts, since he listed his final weights we got the following: Jakes primary gear weighs 570g (1.25lbs) compared to mine at 1.2lbs, his 2nd gear weighs 229g and mine weighs 247g, his 1st gear plus sprag clutch out weighs 373g and mine also weighs 373g. So overall I feel it was pretty comparative. I have room to remove move weight still with cross drilled holes and I didn’t touch the bell at all. Although he beats me quite a bit by not having to run all the parts I have to to maintain pedals and starting. As a side note my first attempt to lighten the gears was a bit over zealous and they became so thin they broke. The second set I made I maintained a minimum thickness of 0.125″ in case you want to try this and need a rule of thumb.
I also continued to work on a new sprag clutch spring to replace the stock one that fails so often. It’s my second attempt at this and while I was making positive progress with it, alas not enough. The shifting felt better on the way up but on the way down it felt a bit worse. More testing will be needed before it’s track ready so I did not run it on the track. But I will continue to pursue this because I think there is good gains to find here.
The bike we started with was missing it’s whole top end. Luckily there was a NOS cylinder on ebay, I had a NOS piston from back in my scooter shop days, and I had a head laying around still. Treats had an intake, full airbox, I have a box of Bazooka Mouth velocity stacks (of course), and a used stock carb was sourced. We also bought a treats crank to use because our original one looks a bit crusty. With my restriction of using only these parts and not wanting to shim the cylinder up it really boxed in my plan. The biggest determining issue is the transfer timing. Without moving the cylinder up or using dedicated porting tools the only way to move the port timing up is to cut the crown of the piston down. There is only so much room before the piston rings and this dimension is my limiting factor. I measured the stock transfer timing to be 100 degrees and I could only get 110 total before I got uncomfortably close to the ring landing. From there I knew that I wanted to run 25 degrees of blowdown which gave me 160 final exhaust duration, and then with the rpms window I was running in I chose 140 degrees intake timing total. Exhaust port is just an oval so 65% width is kinda the max before you run into problems but you can do a little more width on the intake, about 70%. That pretty much blocked in my porting plan. I then simple matched the ports of the exhaust to the muffler flange, and called it a day.
So this project did not really begin until 5 weeks before the race. This sort of limited my pipe options. Treats had only three pipes that would fit the stock A55 cylinder and frame: Why?-turbo, MLM Peoples Pipe, and Treats black pipe. Now there wasn’t enough lead time to order a custom pipe from Cranks so my options were what was in stock. Cry-turbo’s are terrible, I had not used the Peoples, but the Treats black pipe is the one I use for my daily Tomos and the one I used at the dyno. I know this pipe and what it does. It’s easy to tune, has good power, I know it’s operating range and jetting. Plus it can take a hit on the ground and not crank or bend. The winner was clear.


I left the head stock at first. Then I assembled the whole bike and started my tuning. From my previous experience with these bikes I knew where the jetting would be. But the bike was very hard to start. It was very sensitive to the idle air adjustment. After some basic systems checks I found my issue, 75psi base compression. Turns out the stock head is just super low compression and when you bump the exhaust port up then it drops to the floor. I turned 2.0mm off the head and cut in a 15 degree squish band into it and that brought me up to 135psi base compression. My starting issues went away and the bike started to run pretty strong. I was still having trouble with the carb running very rich at idle and off idle transition. After a about an hour of fighting I swapped the carb to a spare I had on the shelf and all my problems went away, I guess there was something wrong with that carb but it will be hard to check from it’s new home in the river. My final carb setting where 25 idle, 30 slide, A12 needle middle clip, 80 main jet running stock intake, Bazooka Mouth, stock airbox with filter and inlet tube drilled to 19mm.
I bought the 20 lbs springs on treats for the first and second clutch and started from there. Using the 700ml racer oil mix from the MA wiki it was still way too low stall. I was running out of time and I just grabbed the whole clutch stack from my daily ride with a 25lb spring on treats better than stock shoes for second and a Lucky 2 Strokes ZA50 clutch on 1st with a 20lbs spring. I ended up just using that all weekend even though it wasn’t as good as it could have been. On the track I realized pretty quick I needed shorter gearing and swapped to a 26t rear for a 1:1 ratio and that meant once the bike left the start it never shifted down again the whole lap. Not really ideal.


Honestly on the track the bike did great. We took second place in stock class and 3rd in non-variated (aka against kitted bikes). At the track the only tuning we did was tire pressure, a little bit of ignition timing (stock to 16 total degrees), and tried a different main jet but settled on the one we showed up with. We had no mechanical issues and it was just very enjoyable to ride. The handling from the suspension made a huge difference and the power was really well suited for the track even if it never shifted down. Five stars, would ride again.
So where does it go from here? Well, there’s lots to do actually. The transmission could be lighter. The clutches need tuning. The starter clutch bearing can be removed and swapped over to a pull start. Port timing can be moved up to 120 transfers, 180 exhaust, 155 intake. A custom pipe could be made too. Plus plenty of suspension tuning to sort out. Basically what I’m saying is I’m coming to win next year.

Flippin sweet, nice work thanks for the writeup.